Why Are My Indoor Plant’s Leaf Edges Turning Brown?
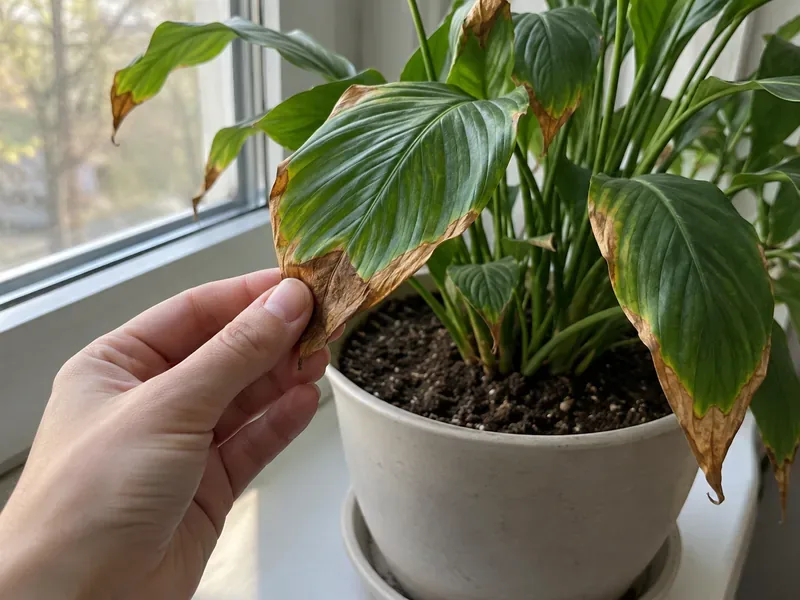
Learn why indoor plant leaves turn brown at the edges, how to read clues about watering, humidity, salts, and light, and when to seek expert help.
Brown edges on an indoor plant are a symptom, not a diagnosis. A current Iowa State University Extension answer, updated February 3, 2026, points to low humidity, inconsistent watering, fertilizer salts, and water quality as common explanations. That range matters: the same dry-looking margin can follow different stresses, and changing several care habits at once can make the real cause harder to spot.
Look at the whole plant and its recent care before deciding what to change. When brown tissue is limited to older leaves and new growth looks healthy, the problem may be slowing. When browning spreads, appears with wilting or yellowing, or comes with visible pests or spots, inspect more closely and consider help from a local extension office.
Low indoor humidity can dry leaf margins, especially on humidity-sensitive tropical plants. Homes can be especially dry when heating is running. Spider plants and dracaenas are among the familiar houseplants that may show brown tips or edges. Dry air is more plausible when the potting mix is not staying dry for long periods and multiple leaf tips crisp at a similar time.
Inconsistent watering is another common cause. A plant that repeatedly dries out too far may develop crisp edges, while a small pot, a root-bound plant, or a warm bright location can dry faster than expected. Do not assume a weekly schedule fits every plant: pot size, potting mix, temperature, light, and humidity all affect how quickly soil dries. The University of Maryland Extension watering guidance recommends checking the potting mix rather than watering by calendar.
Overwatering can damage roots and interfere with water uptake, so a plant may wilt or deteriorate even while its soil is wet. Brown edges alone do not prove overwatering. Look for a combination of persistently wet mix, poor drainage, yellowing or dropping lower leaves, and wilting. If the container has no drainage opening or the saucer stays full, correct that condition before adding more water.
Healthy roots are generally firm and light-colored; roots that are dark and soft can indicate decay. The University of Maryland Extension symptom guide links wilting with both too much and too little water, and notes the importance of well-drained potting media. That is why soil moisture and root condition are more useful clues than leaf color by itself.
Fertilizer salts and minerals left behind as water evaporates can make it harder for roots to take up water. Possible clues include a white crust on the potting mix, around the drainage hole, or on a clay pot, along with browning at tips or margins. The odds rise if fertilizer has been applied too often or too strongly, or if the plant is watered with mineral-rich or softened water.
University of Maryland Extension’s guidance on soluble salts describes browning or dieback at leaf tips and margins as a typical symptom of excessive salts. Do not respond by adding fertilizer to “feed” brown leaves. If the pot drains freely and the mix is not already saturated, a thorough watering that drains out can help flush excess salts; empty the saucer afterward. For a pot with poor drainage, flushing can worsen waterlogging, so fix drainage or seek plant-specific advice first.
Some plants are sensitive to chemicals such as fluoride in tap water. Iowa State Extension notes this possibility for spider plants, dracaenas, prayer plants, and calatheas after extended exposure. If the same plant repeatedly develops brown tips despite suitable watering and humidity, compare the water source and the plant’s species needs before making a change.
Light and temperature can leave different patterns. Strong direct sun or heat can scorch exposed areas, often after a plant is moved to a much brighter window or outdoors. A cold draft or contact with a cold window can damage foliage too. Check whether damage is concentrated on the window-facing side or began after a move, a seasonal light shift, or a nearby heating or cooling vent. Iowa State’s houseplant environmental guide explains that abrupt changes in light can scorch leaves.
| What you notice | What it may suggest | What to check next |
|---|---|---|
| Dry, crisp tips on several leaves | Low humidity, repeated drying, water sensitivity, or salts | Recent watering pattern, indoor air, water source, and white crust |
| Wet soil with yellowing or wilting | Drainage trouble or injured roots | Drainage holes, standing water, and root firmness |
| Bleached or scorched patches on the window side | Strong direct sun or heat | Recent move, time in direct sun, and nearby hot glass |
| Irregular spots, spreading lesions, webbing, or sticky residue | Pests or a leaf disease may be involved | Leaf undersides, stems, neighboring plants, and whether spots are spreading |
These are clues, not a reliable home diagnosis. Several stresses can happen together—for example, dry air plus heavy fertilizing—and different species respond differently. Iowa State Extension cautions that houseplant problems often have more than one contributing factor. Its general diagnostic guidance recommends considering the plant’s light, soil, water, humidity, temperature, and fertilizer needs together.
Start with observations that are easy to reverse. Identify the plant if possible, feel the mix below the surface, confirm that the pot drains, and note recent changes in location, watering, fertilizer, or water source. Compare affected leaves with newer growth. Then adjust the most plausible factor instead of changing everything at once. For many plants, checking soil moisture before watering is a better measure than following a fixed calendar; succulents and cacti are notable exceptions that need less frequent watering.
For dry air, a room humidifier or grouping plants can raise humidity around foliage; the best choice depends on the plant and the room. Misting is short-lived and should not be treated as a cure for every brown edge. For suspected sun scorch, move the plant out of harsh direct sun or acclimate it gradually to brighter conditions. For suspected salts, pause unnecessary fertilizer and confirm the pot can drain before flushing. Follow the care guidance for that species rather than applying a one-size-fits-all fix.
Brown tissue will not turn green again. Trimming only the dead edge with clean scissors can improve appearance, but it does not correct the cause; Iowa State Extension notes that browning can return if the underlying condition continues. Avoid cutting into healthy green tissue, and do not remove many leaves at once if the plant is already stressed.
Pay closer attention if damage is moving into new leaves, the whole plant is declining, stems soften or darken, roots are mushy, or spots and pest signs are spreading. Isolate a plant with suspected pests from nearby plants while you inspect it. If careful adjustments do not improve new growth, or you cannot distinguish a watering problem from root damage or disease, share clear photos and the plant’s care history with a university extension service or a knowledgeable local plant clinic. The limit of visual troubleshooting is important: edge browning can guide what to inspect, but it cannot identify the cause on its own.
Learn why indoor plant leaves turn brown at the edges, how to read clues about watering, humidity, salts, and light, and when to seek expert help.
Keep stored clothes dry without mothballs: measure closet humidity, reduce moisture at the source, dry garments fully, choose suitable storage, and inspect for mold.
Musty towels often point to lingering moisture, washer residue, or slow drying. Learn how a hypothetical laundry example helps narrow the cause and what to change first.
Keep balcony plants hydrated during a short trip with a plan based on pot size, plant needs, sun, and wind. Compare wicks, self-watering pots, and plant sitters.
Move a heavy houseplant safely without scratching hardwood, denting flooring, spilling soil, or straining your back. Use a protected path, a dolly, and a controlled team lift.
Keep a small entryway clear with simple landing zones, limited shoe and coat storage, a quick reset routine, and a safe path through the door.
A freshly cleaned room can look dusty again because particles resettle, new dust enters, and cleaning can stir particles into the air. Learn what to check next.
Make deep cabinet storage easier to use with removable bins, turntables, shelf zones, and pull-outs. Learn what works, what depends on your cabinet, and what to measure first.
Patch a small drywall hole with thin coats, careful sanding, primer, and matching paint. Learn how to avoid visible edges, craters, and paint halos.
A warm refrigerator door seal can be normal, but weak grip may point to dirt, misalignment, damage, or airflow issues. Learn what to check and when to call for service.