Home
» Food & Drink
»
Simmering vs. Poaching vs. Boiling: How to Tell the Difference
Simmering vs. Poaching vs. Boiling: How to Tell the Difference
You lower a delicate fish fillet into a pot, turn away for a moment, and return to water churning hard enough to break it apart. Or a recipe says “simmer,” but the pot seems either still or wildly active. These terms describe different levels of heat and movement in a cooking liquid. Knowing the visual cues helps you choose the right one without relying on a stove dial.
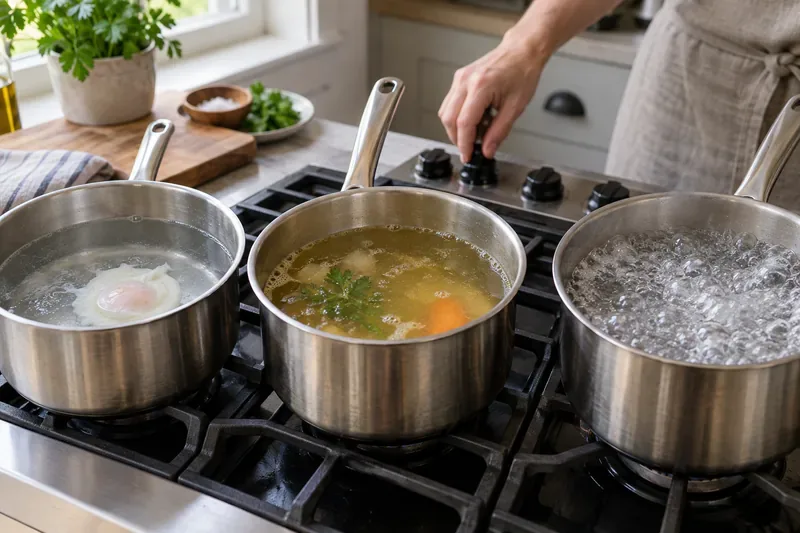
Left to right: nearly still poaching liquid, gently bubbling simmering broth, and vigorously boiling water.
The quick difference
Poaching is the gentlest method, simmering is a steady but controlled bubbling stage, and boiling is the most vigorous. They form a continuum: a low simmer can look close to a strong poach, and the exact boundary varies by recipe and cooking reference. Watch the liquid itself, not just the burner setting.
Method
What you see
Common reference temperature
Good uses
Poaching
Liquid is nearly still, with a faint shimmer and few or no bubbles breaking the surface
About 160–185°F (71–85°C)
Eggs, fish, chicken, fruit
Simmering
Small bubbles rise gently and intermittently; the surface moves without a rolling churn
About 185–200°F (85–93°C)
Soups, sauces, stews, beans, stocks
Boiling
Large, vigorous bubbles continually break across the surface
Water boils at about 212°F (100°C) at sea level
Pasta, many vegetables, and recipes that call for rapid boiling
These are practical reference ranges, not universal cutoffs. Culinary sources sometimes place poaching and low simmering near one another. The Escoffier culinary textbook gives the ranges above, while Purdue Extension’s cooking basics emphasizes the difference in visible bubbling. For everyday cooking, the recipe’s texture goal and the surface cues matter more than hitting one exact number.
Why the distinction matters
Heat changes how quickly food cooks and how much the liquid agitates it. A rolling boil can toss delicate ingredients around, break apart a poached egg, or make a fish fillet less intact. It may also cause a pot to boil over. A gentle simmer keeps ingredients moving less while allowing longer cooking; poaching uses even milder heat for foods that benefit from a tender, delicate result.
Boiling is useful when a recipe needs vigorous heat or when the food can handle active movement, such as pasta in plenty of water. But “hotter is always faster and better” is not a good rule. A stew or sauce that boils hard can reduce too quickly or cook unevenly, and a delicate protein can become firm before its surroundings are ready.
How to bring a pot to the right stage
1. Start with the recipe and the food
Choose the method the recipe calls for. Poach foods that are delicate or need gentle cooking; simmer foods that need time for flavors to blend or ingredients to soften; boil when a recipe calls for a rolling boil. If you are unsure, begin gently. You can raise the heat, while an overactive pot can be harder on delicate ingredients.
2. Watch for the surface cue
Heat the liquid, then look closely as it warms. For poaching, look for a quiet surface with a slight shimmer and little active bubbling. For a simmer, look for small, gentle bubbles and movement that does not constantly toss the contents. For a boil, wait until vigorous bubbles continue across the surface.
A single bubble at the edge does not mean the whole pot is boiling. Conversely, food added to hot liquid can cool it temporarily, so give the pot time to return to the intended stage before judging it. A burner’s “low,” “medium,” or “high” label is only a starting point: pan size, liquid volume, burner output, and the pan’s material all affect how the pot responds.
3. Adjust the heat in small steps
If a simmer becomes a rolling boil, lower the burner a little and watch for a minute. If the bubbling stays vigorous, reduce it again or briefly slide the pot off the burner. If a pot is too quiet for a recipe that needs a simmer, increase the heat slightly. Once the liquid reaches the desired stage, use the lowest burner setting that maintains it.
4. Use a thermometer when temperature matters
An instant-read thermometer can help you understand a liquid’s temperature, especially while learning, but it does not replace the visual cues or the recipe. Keep its sensing area in the liquid without resting it against the pot. At higher elevations, water boils below 212°F because air pressure is lower; the Colorado State University Extension high-elevation guide explains how that can lengthen cooking times.
Common mistakes and easy fixes
Turning the burner to high and leaving it there: Water can move from a simmer to a boil quickly. Stay nearby while heating, then reduce the setting once the target cue appears.
Using bubbles alone without checking where they appear: A few small edge bubbles can be a gentle stage; a rolling boil has vigorous bubbles breaking repeatedly across the surface.
Assuming a poaching temperature makes food safe: The liquid and the center of the food are not the same temperature. Cooking poultry, fish, eggs, and other animal foods gently can be fine, but doneness still depends on the food reaching a safe internal temperature.
Confusing “boiling” with “fully cooked”: A boiling pot does not guarantee that a thick piece of food has reached a safe temperature at its center. Use a food thermometer and check the USDA FSIS safe temperature chart. The USDA also explains how to use food thermometers.
Check the result before you walk away
Use this quick check while the pot cooks:
Poach: The surface is mostly calm, with a faint shimmer and no rolling motion.
Simmer: Gentle, small bubbles appear and the liquid moves steadily without tossing the ingredients around.
Boil: Vigorous bubbles keep breaking across the surface.
Then check the food itself: is it cooking at the pace and texture the recipe describes, and, when food safety requires it, has its center reached the USDA-recommended internal temperature? If the liquid looks right but the food is not done, keep cooking gently and check again. Matching the bubble pattern to the task—and measuring the food’s internal temperature when needed—is a more reliable check than trusting the stove knob.